
This Tui Na self massage is a simple sequence you can use
- as a warm up before practicing acupressure self-help
- as a quick energy pick-me-up at any time of day
- as a complete practice in itself to be done daily.
As energy (chi) moves through its pathways in the energy channels, it has a tendency to get stuck — especially in the joints — and to cause pain. This self-massage of the energy channels encourages the smooth flow of chi through the joints and in all the channels.
The strokes
The sequence uses four different strokes. For each stroke, you should move between the joints: for example, from shoulder to elbow, elbow to wrist, wrist to fingertips.
The four strokes are Brush, Grasp, Tap and Circle:

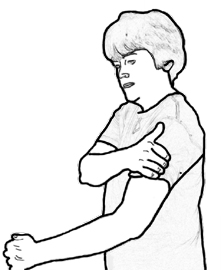
1. Brush with the flat, palm-side of the fingers.
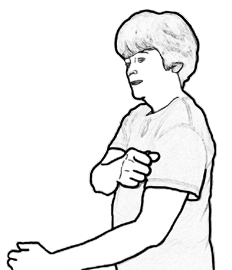
2. Grasp and squeeze the tissue with the palm of the hand. Pick the flesh up off the bones.
3. Tap with a loose fist (as if holding a raw egg). Make sure your wrist is very relaxed.
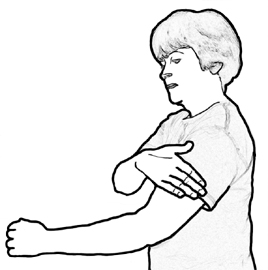
4. Circle with the flat of the fingers. Use enough pressure to move the flesh over the bones.
Do each stroke at least five times between each pair of joints.
Repeat the entire sequence — described in the next section — for each stroke. That is, do the brush stroke five times between each joint for the entire sequence. Then do the grasp stroke five times between each joint for the entire sequence. Then the tap, then the circle.
The sequence
The left arm and torso
You use the right hand (obviously) to stroke the left arm, but once both hands are free, use both hands for each stroke. So here, you would start using both hands on the left torso.
 1) Down the inside of the left arm (upper arm, forearm, hand)
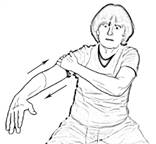
2) Up the outside of the left arm (hand, forearm, upper arm)
3) Down the left side of the torso (from armpit through ribs to pelvis)
The legs and torso
We’re brushing in the direction the energy channels flow. That’s why you don’t go down the inside of right leg and up the outside of the right leg (as you might be tempted to do). Remember, you can use both hands on the legs and right torso.
You may not be able to reach your feet. That’s OK. Stroke only as far as is comfortable for you, for example, to the knees and perhaps a little of the calf.
 4) Down the outside of the left leg (thigh, calf, foot)
5) Up the inside of the left leg (foot, calf, thigh)
6) Down the outside of the right leg
7) Up the inside of the right leg
8) Up the right side of the torso (from pelvis through ribs to armpit)
The right arm, chest, abdomen, back and head
Use your left hand to stroke the right arm. Use both hands on the chest, abdomen, back and head.
When you get to the head using the tap stroke, you can tap all around the skull. You can’t really grasp the skull, so massage the scalp for this stroke.
9) Down the inside of the right arm
 10) Up the outside of the right arm
11) Chest
12) Abdomen
13) Low back
14) Head
I encourage you to try this self massage. You may be surprised to find it’s both invigorating and relaxing. If you enjoy this massage, try doing it daily for at least a week and see how you feel.
This practice is so easy to do. It requires no equipment and can be done anywhere that you can sit down. If you have some privacy in your workspace, try using this as break — it’s good for stress reduction. If you don’t have privacy at your workplace, consider trying it anyway. Maybe you’ll even be inspired to teach this to curious co-workers, and then you can do it together as a group.
Related posts & pages:
What Is Tui Na?
Tui Na: Rebalancing Your Energy
Tui Na Resources